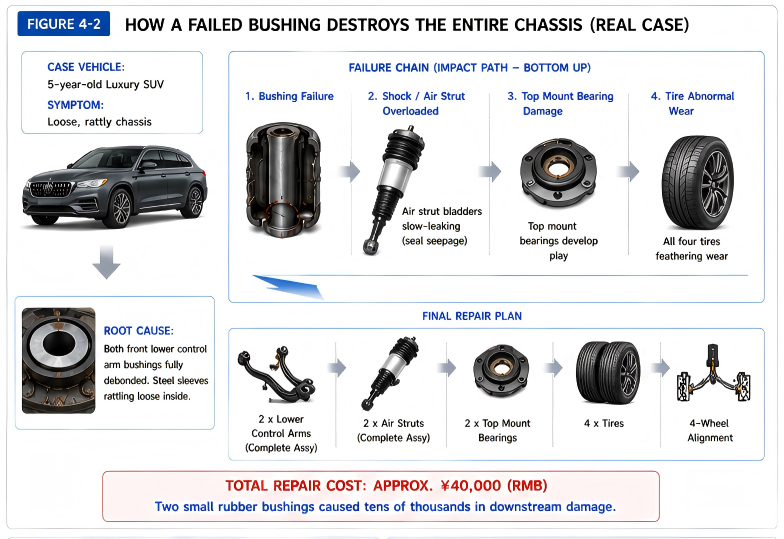
I've seen too many repair bills in my career that all traced back to a single bushing. The worst case I remember — a five-year-old luxury SUV, owner complaining of a loose, rattly chassis. We put it on the lift. Both front lower control arm rubber bushings had fully debonded. The steel sleeves were rattling around loose inside. Looking upward from there: because impacts were no longer being attenuated, both front air strut bladders had started slow-leaking, oil seepage at the seals. Top mount bearings had developed play. All four tires showed irregular feathering wear. The final repair plan: complete control arm assemblies for both sides, two air strut assemblies, two top mount bearings, four new tires, and a full four-wheel alignment. Total bill was knocking on the door of forty thousand yuan. And the root cause? Two rubber bushings that reached end-of-life, nobody checked, they ran until complete failure, and then took down every downstream component that cost more than they did.
After that case, I started telling everyone I could: don't let a worn bushing destroy your entire chassis.
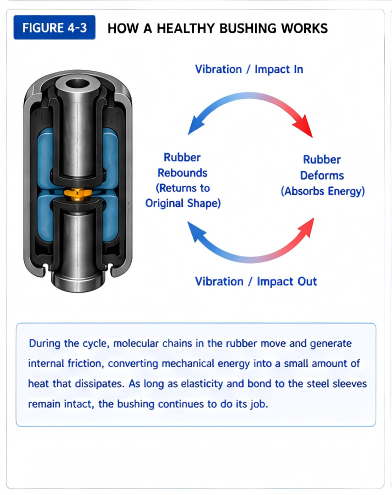
First, understand what a bushing does so you grasp what happens when it stops doing it. The links in a suspension system — control arms, tie rods, anti-roll bars — can't be bolted together rigidly. Metal-on-metal, every road vibration would transmit undiminished along a rigid path straight into the cabin. That's what driving a car with no suspension would feel like. So every pivot point needs an elastic element — to cushion, isolate, and attenuate vibration. That element is the bushing.
A healthy rubber bushing works like this: vibration arrives, the rubber deforms elastically, absorbing some energy. Vibration passes, the rubber rebounds to its original shape. During this cycle, internal molecular chain movement generates internal friction, converting mechanical energy into negligible heat that dissipates. As long as the rubber retains its elasticity and the vulcanized bond to the inner and outer steel sleeves remains intact, it keeps doing its job.
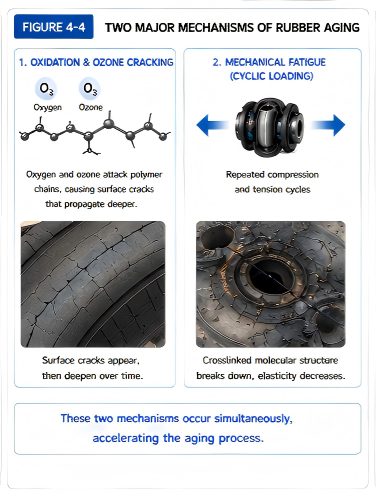
The problem is rubber aging. It happens through two mechanisms. One is oxidation and ozone cracking — oxygen and ozone in the atmosphere attack the polymer chains, micro-cracks form on the surface, then propagate deeper. The other is mechanical fatigue — repeated compression and tension cycles progressively break the crosslinked molecular structure, elasticity decays. Both mechanisms usually operate simultaneously. By the time you see surface cracking with the naked eye, internal elasticity has already begun to decline.
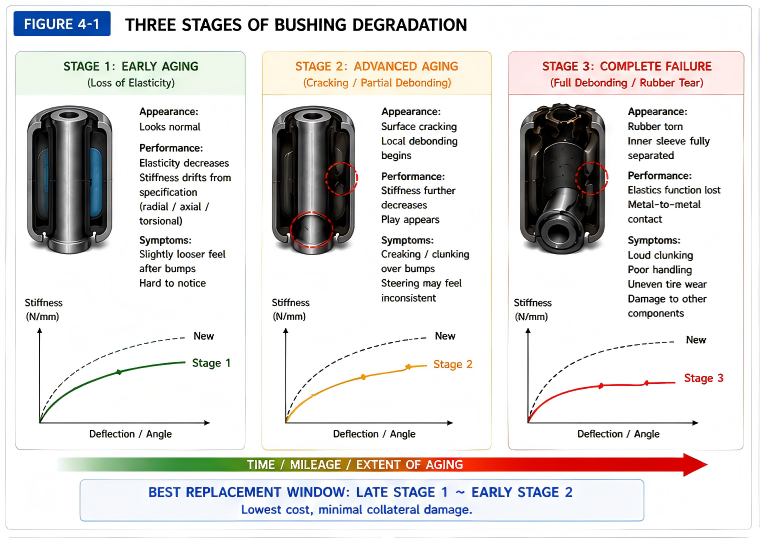
Stage one of aging: elasticity drops, stiffness drifts from specification. Those three carefully calibrated stiffness values — radial, axial, torsional — start deviating from design targets. At this stage, symptoms are subtle. Maybe you notice the chassis settling a fraction more loosely after speed bumps than it used to. Maybe you don't notice anything at all. Many owners miss the replacement window right here.
Stage two: cracking deepens, localized debonding begins. Debonding means the vulcanized layer between rubber and steel sleeve starts tearing locally. The rubber no longer grips the sleeve securely. Once gaps appear, the suspension link generates impact under load — relative movement between the steel sleeve and rubber produces creaking or clunking. At this stage, most drivers hear something. But some figure "it's just a noise, the car still drives fine" and keep going.
Stage three: full debonding or rubber tearing. The bushing's elastic function is gone. The suspension links are now in rigid contact. Impact energy passes upstream with zero attenuation. At this stage, every bump is hammering the dampers, the top mount bearings, the air spring bladders. Tire alignment angles drift wildly without the bushing's constraint — tread starts wearing uneven, feathering. By the time you fix it now, it's not a matter of replacing a few bushings.
So the bushing's life curve follows a steep drop: slow aging early, acceleration in the middle, cliff-edge cascade failure at the end. The cheapest move is to replace at the tail end of stage one or the beginning of stage two. Not wait until stage three.
Beyond aging itself, there are a handful of common operational errors that kill a bushing prematurely.
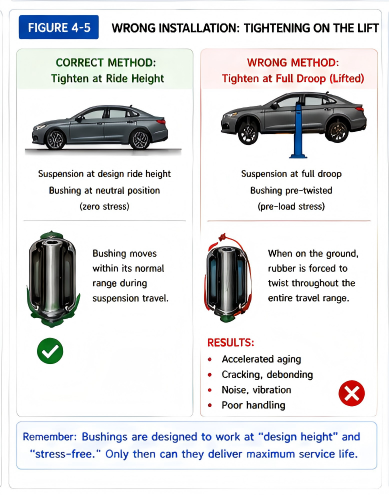
The number one killer: tightening on the lift. I've lost track of how many workshop mechanics I've argued with about this. A rubber bushing should be at zero stress in exactly one suspension position — when the vehicle is on the ground, suspension at design ride height. If you torque the bolts while it's on the lift, the suspension is at full droop, and the bushing is locked at a twisted initial angle. Once the vehicle returns to the ground, the rubber is forcibly twisted through the entire suspension travel range. This torsional stress is continuous — it doesn't relax over time. Rubber is a viscoelastic material; stress relaxation is extremely slow. Operating under this permanent pre-twist, a bushing designed for sixty to eighty thousand kilometers might crack at twenty thousand.
The correct method is one step: hand-tighten all bolts, lower the vehicle until the tires are loaded, then torque to spec. That's it. Not every shop does it. You need to watch for it.
The second trap: bolt reuse. German cars especially — Mercedes, BMW, Audi — use torque-to-angle fasteners extensively on suspension joints. A base torque is applied, then a specified angle is turned. This yields the bolt into the plastic region; thread deformation is permanent. Once removed, that bolt has completed its design service life. Reinstall it, and even if it looks fine, the clamping force won't reach the specified value. Inadequate clamping force means the bushing can shift under load — you've basically given the old bushing more clearance rather than replacing it. Aluminum bolts are even more fragile. Remove equals replace, no debate.
The third trap: replacing only one side. Suspension is designed symmetrically, left and right paired. If the left front control arm bushing has cracked, the right side is likely in similar condition, just not symptomatic yet. Nobody mandates replacing both sides, but I strongly recommend at least inspecting both. If you replace only one side, the new bushing has different stiffness from the aged one on the opposite side. Under identical road inputs, the two wheels respond differently, and the car will drift slightly. Not catastrophic, but you'll feel it. And a single alignment costs the same regardless — when the other side goes in a few months, you'll pay for alignment again.
The fourth trap: replacing the bushing but not the ball joint. A control arm typically has two connection points — one bushing to the subframe, one ball joint to the knuckle. The ball joint's dust boot is rubber, with roughly the same service life as the bushing. You go through the trouble of pressing in a new bushing, and months later the ball joint starts clunking because its boot tore and let grit in. Now you're disassembling the same corner again. That's not maintenance, that's self-inflicted frustration. When the bushing is out, inspect that ball joint boot. Replace together if in doubt — one disassembly, one alignment. Cheaper and easier.
The fifth trap: the one I opened with. Procrastination. You hear the chassis making noise, but you keep driving for six months. Then the noise stops — not because it healed itself, but because it's debonded to the point of direct metal contact. By this stage, the control arm's pivot bore may be worn oversize. Now you can't just replace the bushing — the whole arm needs replacing. A control arm assembly costs far more than the bushing alone.
One more bad habit worth mentioning: settling for aftermarket. Some people say "it's just a rubber ring, what's the difference between the OEM one that costs hundreds and the generic one on Taobao for a few dozen bucks." The difference, you find out after one drive. An OEM bushing's rubber formulation, vulcanization process, interference fit on the inner and outer sleeves, the fluid viscosity and orifice dimensions on a hydraulic unit — every single parameter was calibrated against the vehicle's chassis tuning. An aftermarket part might get the hardness vaguely right, if you're lucky. The damping characteristics? Forget it. Swap them in and the chassis goes loose, noises multiply, tires wear unevenly. Don't ask me why — you chose it. Put a fifty-yuan aftermarket bushing into a million-yuan car, the chassis refinement drops to the level of a car worth a quarter of that. If you're genuinely fine with that, then fine.
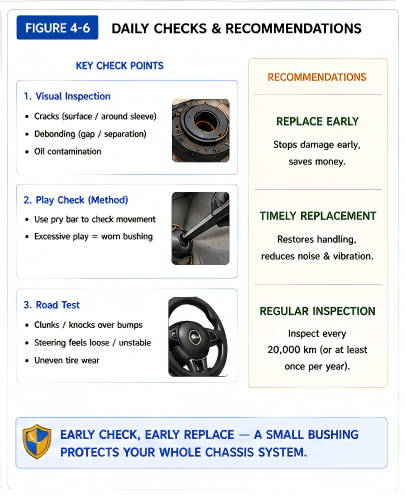
Last question: when should you check the bushings? I'm not talking mileage — that varies too much by load, road conditions, driving style. I'm talking about signals you can perceive. After a speed bump, does the body oscillate one more cycle before settling than it used to? Under hard braking, does the nose dive deeper than before? At highway speed, when you initiate a lane change, does the body respond a beat later than it used to? Look at your tires — is there abnormal uneven or feathering wear? Any one of these four signals, get the car on a lift and check the bushings. No fancy diagnostic equipment needed. Have the mechanic take a pry bar to each pivot point, check for free play, visually inspect the rubber for surface cracking or debonding. Ten minutes.
The chassis is mostly a system of gradual failures — it gives you plenty of warning. Bushings are the earliest signal and the cheapest fix. Catch them in that window, and you're looking at a few hundred to a couple thousand in repair cost. Miss that window, let the cascade hit everything downstream, and the math gets ugly. You do the math.